Saturday, February 27, 2010

D is for Door

Today's letter was D. There are so many options to do with D, but I chose door.


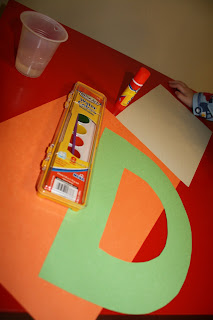
Supplies needed: cup of water, water color paints, construction paper, scissors, glue stick, and stapler.


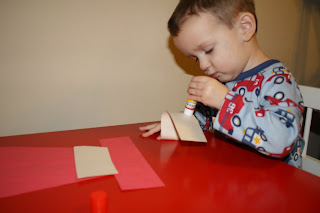
I cut a letter D and a rectangle about the same size as it from construction paper. I then let Mr. T paint the rectangle (door) with water colors.

We glued the D on the paper. Then I stapled the door over the D since staples could withstand opening and closing better than glue.


Mr. T loved opening and closing the door!

Friday, February 26, 2010

Dr. Seuss

Tuesday is Dr. Seuss's birthday. We are planning on going to a community wide birthday celebration at our library Monday night, so I decided today we would make a Cat in the Hat hat today. I've made these many times with the kiddos that have passed through my classroom, so I modified it a bit for my little guy.


Supplies needed: construction paper, scissors, stapler, and glue stick.

This activity was more parent involved than child involved. I started by folding a piece of red construction paper in half hot dog style and free handing a hat pattern from it. In first grade, I typically gave the kiddos a pattern copied on red construction paper that they cut themselves. I also cut a long band and strips of white construction paper.


Mr. T then glued the strips on the hat. I stapled the band around the back and let him try it on. In my classroom, we always cut two pieces of red paper and stapled it to a band and again at the top for stability. I wish I would have done that here in that it doesn't stand up when he is wearing it.

Wednesday, February 24, 2010

Dental Hygiene Month

As a first grade teacher, we always celebrated dental hygiene month. We would talk about the importance of brushing our teeth and even chew on the little pink tablets. I must admit that it would often make my stomach turn looking at the results from those little pink tablets.

Anyway...Tucker and I created a big toothbrush last week. During this activity, I let him use safety scissors for the first time. I was a little worried, but he did great!


Supplies needed: copy paper, construction paper, glue stick, marker, and scissors.

To begin, I cut the copy paper in half hamburger style and the construction paper in half hot dog style. I then drew lines on the copy paper for him to use as a guide for cutting.


I then showed Mr. T how to hold the scissors and even helped him cut a few inches. Then I turned him loose! He did great for it being his first time. As much as I would have liked him to cut along the black lines, I didn't care if he did or not...I just wanted to him to start getting a feel for cutting.


After cutting the copy paper, Tuck glued it to the construction paper to make his toothbrush. Then he begged to go brush his teeth!

Tuesday, February 16, 2010

Color Clips

This was a fun activity working on fine motor skills while also focusing on color recognition and matching that we can do over and over again.


Supplies needed: construction paper, scissors, clothespins, and magic markers.

During nap time, I cut squares from construction paper and colored the ends of clothespins to match. I then modeled the activity for Mr. T before letting him loose matching the colored squares to the clothespins.


Tuck loved this activity, but he had some problems figuring out how to pinch the end of the clothespins to attach to the squares. After lots of modeling and practice, he seems to be grasping the concept better.

Just a little side note...My child does own pants, but we are potty training and he does much better when we're at home without pants on.

Monday, February 15, 2010

Muffin Tin Monday: Red

Muffin Tin Monday at Her Cup Overfloweth Today we began Muffin Tin Monday at our house to try to spice up our boring lunchtime routine as well as implement some learning fun. Today's theme was red.


We had spaghetti o's with weiners, strawberry jello with diced peaches, heart toast with strawberry jam, and red goldfish crackers all served up in a heart muffin tin.

C is for Corn

Today, we worked on the letter C. Tuck loves to eat corn on the cob (and I had some in the freezer) so it was an easy choice.


Supplies needed: construction paper, glue, yellow paint, paper plate, and corn.

Cut a letter C from paper before allowing your child to glue the letter to the construction paper.


Roll the corn in the yellow paint and then roll it on the paper.


As I have mentioned before, Tuck hates having his hands dirty. We are trying to let him know that it isn't going to hurt him, so I'm encouraging him to get his hands dirty as much as possible. Today was not the day that he was going to be OK with it! He got a little bit on his fingers, and he was finished! I finished painting for him to show him that it was alright before showing him that the paint washes right off. Oh, well! Another day!

Valentine Fun


We had a VERY busy week last week, so I'm just getting around to posting our Valentine treats that we made for Tuck's classmates and teachers at Mother's Day Out.

I found this idea somewhere on the internet, but I can't remember where to link back to it. I found these shovels at Hobby Lobby for 99 cents with 30% off. Using a white paint pen, I wrote "i dig you" on the front and "happy v-day love tucker" on the back. I completed them with a bag of mini M&Ms, and they were a hit.

I also found another idea for his teachers' gifts from another blog. (I again forgot where, so I'll try and find it and link back to it later.) These were so inexpensive to make! I bought a box of fortune cookies at Wal-Mart for less than $2. There were 13 cookies in the box. I had some white almond bark left from Christmas, so I melted it and added a few drops of pink food coloring. I dipped each cookie into the chocolate and set it aside to harden. I put them in boxes that I found very cheap at Hobby Lobby, and added a tag that read (We are so fortunate to have you as a teacher! Love, Tucker and family. Viola! So easy and cheap!

Friday, February 5, 2010

B is for Ball

Today, we worked on the letter B. There were so many options for B, so I chose another one of Tuck's favorite things: a ball.

Supplies needed: construction paper, glue stick, pom poms, and crayons.


1. Mommy cut a B from a sheet of construction paper.

2. Child can glue the B on another sheet of paper before gluing on the pom poms and coloring the paper.


Thursday, February 4, 2010

Let's Sing Microphone


Mr. T loves to sing. He doesn't like for anyone to sing with him though. If you sing along, he tells you to "top singing"! Today we made a microphone.


Supplies needed: toliet paper roll, paper towel, gray and black markers, and a glue stick.


Allow your child to color the paper towel using a gray marker. NOTE: This table is amazing! It costs under $15 from IKEA and everything wipes right off of it.


Then color the toliet paper roll with a black marker. As you can tell by Tuck's face, this step is serious business! Wad the paper towel up and glue it to the top of the toliet paper roll. Start singing!

Colors, Shapes, and Trucks

Tucker is into cars and trucks right now. He lines all of his cars up and drives and crashes them on his road rug. While at the library last week, he picked out a new book that is part of the Jon Scieszka Trucktown Series, Smash! Crash!. It is a very cute book about two trucks that like to smash and crash into things...very little boyish! After reading it, we decided that during our "school time" we would make a truck.

Supplies needed: colorful construction paper, scissors (for mommy), glue stick, and crayons.


I started by cutting shapes from different colored paper. I cut a small square for the cab of the truck, a rectangle, 2 circles for tires, and a circle for the sun. We then talked about each of the shapes and the colors of them.


Let the gluing begin! Tuck loves using a glue stick! I had to show him where to place each shape, but other than that, he did it all on his own. We finished off our piece by adding some more color.


Wednesday, February 3, 2010

Heart Run

Today we worked on color recognition again.

Supplies needed: different colored hearts cut from paper


I cut various colors of hearts and layed them around the living room floor.


As I called a color, Tucker would go jump on the heart and bring it to me.


Tuck loved this activity, and it was a great way to burn some energy from being cooped up inside the house from the recent Winter storm.

Tuesday, February 2, 2010

A is for Apple

Today we had fun with the letter A. Tucker loves apples, so I automatically decided to paint with apples.


Supplies needed: construction paper, an apple, a knife (for mommy's use only), a paper plate, glue, and red paint.

1. Mommy: Cut out a letter A.


2. Kiddo: Glue the letter to paper.

3. Mommy: Cut the apple and pour out paint.

4. Kiddo: Stamp the apple onto the paper over and over again.


Tucker loved gluing the A on the paper and loved painting at first. Mr. T has a major phobia of having anything on his hands. Once he got some paint on his hands he was finished!

Monday, February 1, 2010

Book Review: Time to Pee

This cute potty time book by Mo Willems puts the process of potty time very simply. I like the fact that it can be read to either boys or girls and doesn't show many body parts like other potty books.

Color Pom Pom Sort

We are currently working with Tucker on his colors. Tucker sat and sorted the pom pom balls over and over for almost 30 minutes (which is a long time for a very active 2-year-old). We also practiced counting the pom poms.


Supplies Needed:
  • Egg Carton

  • Markers

  • Pom Poms

1. Cut the egg carton to provide the number of squares for the number of pom poms that you are using.

2. Color the circle in the bottom of the carton to correspond with the pom poms.


3. Model sorting with your little one.

4. Let the fun begin! Correcting as needed.


Tucker really enjoyed this project, and it is one that we can keep and do often. We counted pom poms as well as practiced saying the color names.

Us

Welcome to my new blog! I'm a teacher turned mommy of a wonderful 2-year-old little boy that is awaiting the arrival of his little sister very soon.

As a teacher, I always enjoyed coming up with creative learning activities that went beyond just completing worksheet after worksheet. Now that I'm a stay-at-home mom, I am constantly looking and creating activities to enrich my own kiddo's learning.


I hope you and your toddler will join in on the fun!

Watch for a shopping lists so that you can gather the supplies to complete the daily activities with us.